Putting it into practice
Let’s put into practice our knowledge that we have acquired in the technical documentation based on the theme sample**Forest**.
Note
We recommend that you use the sample to create your theme because it There are built-in development tools that will allow you toTest in developer mode, successively your theme during itCreation without the need to import it to the platform.
Installing the Sample
Let’s start by installing the sample first. Here is the sample link.
Extract the contents of the archive somewhere on your desktop.
Open the project on your favorite IDE
Compilation of the project
Let’s do some configurations on the sample.
Configuration
Open the gradle.properties file. You should have all this:
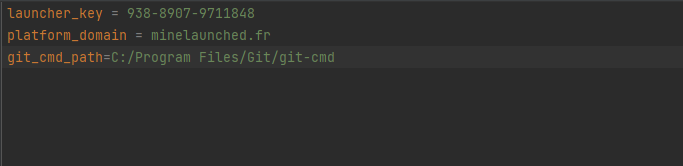
Replace the launcher key with your own.
Do not touch the property platform_domain at risk ofBreak everything.
Replace git_cmd_path with the path of git-cmd.
Synchronization
In this step, you need to synchronize gradle for it to take incount your edits above.
build
Every time you change your theme, you have to launch a gradlebuild to get the jar file that matches your theme and that itWill then have to import on the platform to put it online.
You can either:
Type the command gradle build in a terminal while placing yourself wellat the root of the project
Via an interface integrated into your IDE
Note
In developer mode, the jar file is generated and then moved to the Directory of the game of your launcher, in a specific location forcan be taken into account. Thus, in this way, you will not have Need to import it every time on the platform to test it.
Tree
The purpose of this section is to briefly analyze the sample.
Warning
The rendering of the tree will not be the same in all IDEs. So, don’tDon’t be surprised if you don’t have the same thing in your IDE. Here, we use Intellij.
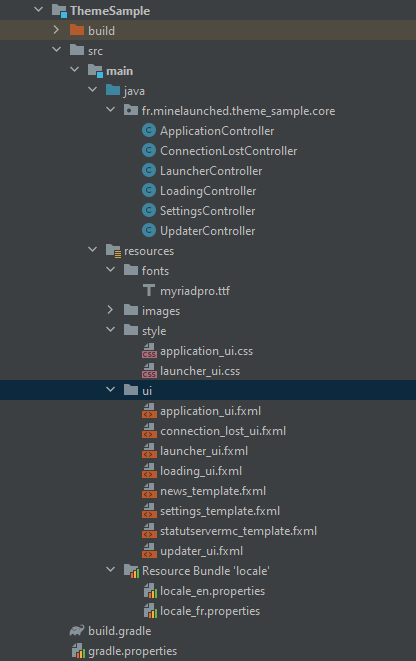
In the sample, the files are organized as follows:
Note
We strongly advise you to organize your project as in the imageabove, so that everyone has a universal structure.
Controllers
The package containing all controllers is called fr.minelaunched.theme_sample.core.
We find the FXML controllers of the system and the FXML controllerscompulsory.
Your FXML controllers will also go into this package if you decide tofollow precisely this structuring (It’s up to you to do otherwise,It’s just a piece of advice).
Resources
As you will have noticed, the FXML files are located in the ui folder,
CSS files in the styles folder,
The translation files in the resource bundle folder,
The rest is obvious so no need to talk about it.
Understanding the system in practice
We will see very quickly through the sample, the way of which is “made” the system so that you have an idea and that you take your bearings to fend for yourself.
SceneBuilder
Let’s see what the Forest theme window looks like onSceneBuilder and let’s make some comments on it.
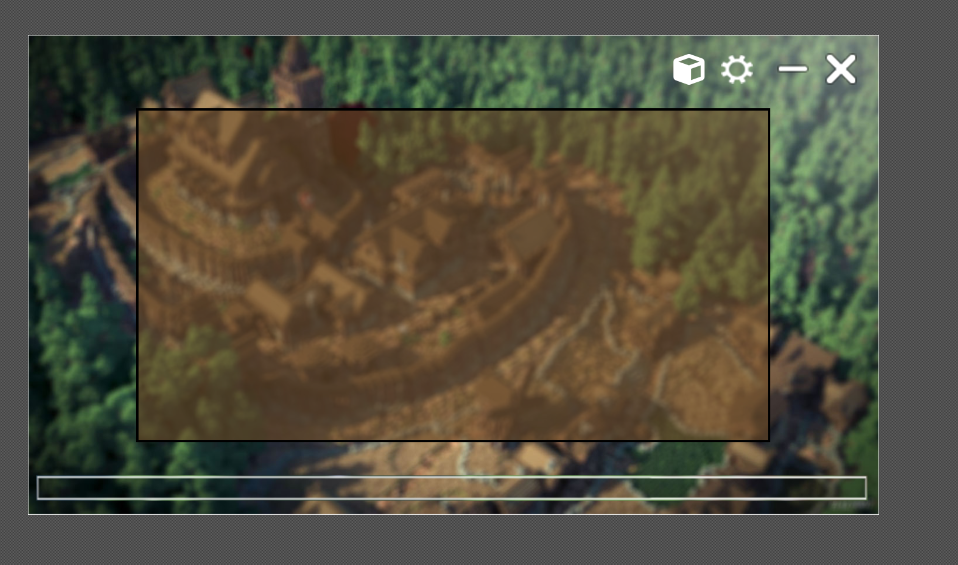
application_ui.fxml
Open on SceneBuilder the application_ui.fxml file located in the UI folder.
This is what the window looks like:
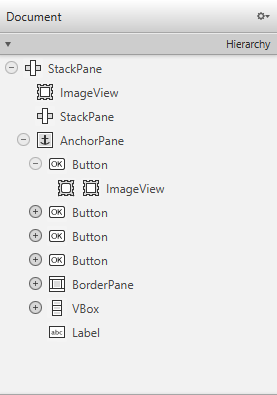
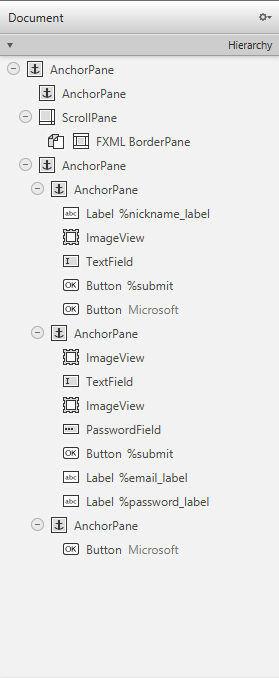
Here is the hierarchy of elements:
In the window you have:
The background image -> ImageView (first element of the hierarchy of the FXML document),
At the top right, the -> toolbar in the AnchorPane one of the pimples,
In the middle, the frame where we see the elements of the Launcher system, Updater etc… (This item has for identifier #app_container see technical doc) -> the BorderPane seen in The AnchorPane,
At the bottom, the progress bar, the label for download and Copyright (which we do not see and which will be pre-filled by the system) -> In the VBox
Note
Feel free to unfold the items and click on them for Find on the window. You can also take a look at the properties in the inspection bar on the right.
Note
As a reminder, the duo (progress bar and label) can go anywherewhere in application_ui.fxml (or in subelements) or in updater_ui.fxml. It’s up to you. See the description of the system and the Technical doc to learn more.
launcher_ui.fxml
Open in SceneBuilder the launcher_ui.fxml file located in the ui folder.
Here is the hierarchy of elements:
The contents of this file, will be integrated into the element #app_container in the Launcher state of the system. So you have to project yourselfby acting as if this element was in the application-” windowui.fxml (You can also embed it in the window by hand to take a look and then transfer it to the document launcher_ui when you’re done, to test).
Moreover, you will find all the elements that have been cited in the Technical documentation. Take a look at it in the bar inspection by searching one by one for these elements from theiridentifier.
Everything in the parent element of the FXML document, can be considered tabs.
Because of this, there is a tab:
For each authentication form (Cracked, Microsoft, Customized)
For settings
For the news
For ServerServer™ status
You will find that these tabs are invisible to most. From Anyway, visibility is managed by the system so they Whether visible or not it will not change anything on their operation.
Translation
If you pay attention, in the hierarchy of the document, we see the semantics associated with translation, the famous prefix %. Don’t forget Not that you have to translate all the texts if your theme is reserved for General public. Also take a look at the translation files To fully understand the mechanism of translation.
ApplicationController
Now let’s review the ApplicationController:
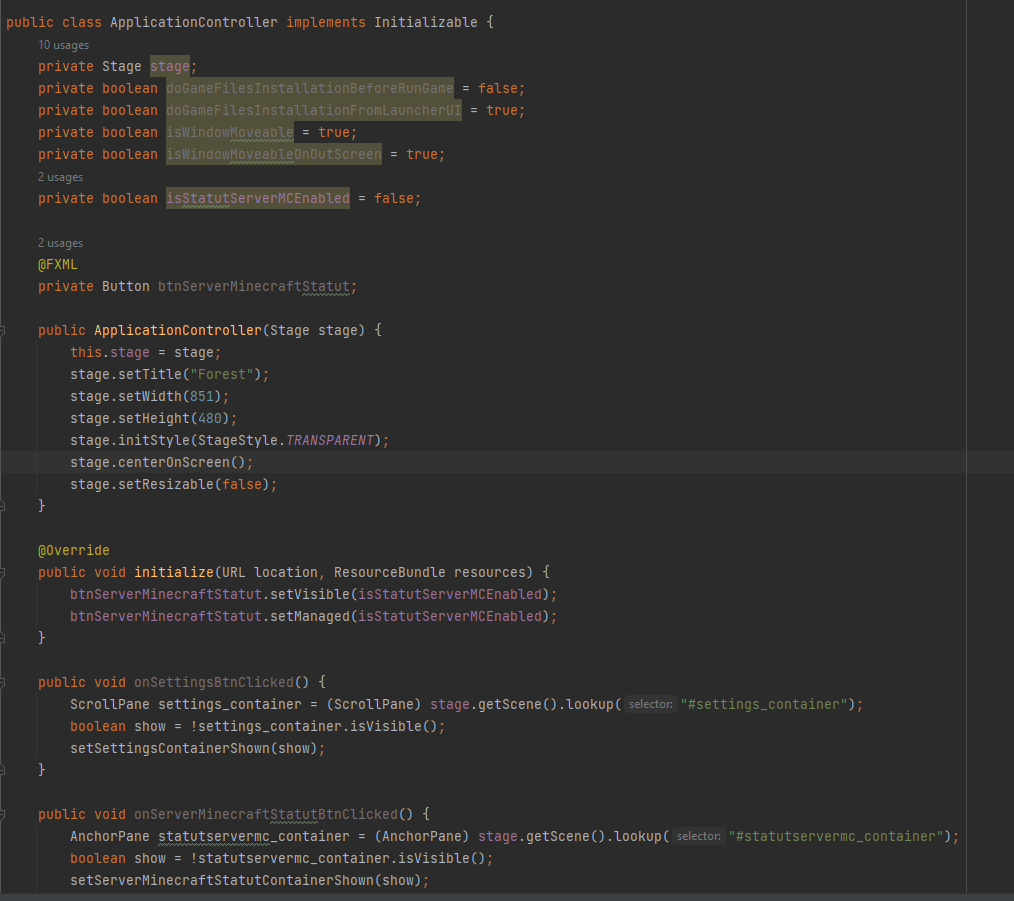
We define in the manufacturer of the controller, the title of the application, the dimensions of the window, the style of the window, onindicates that one wants the window to be centered on the screen and that it does not or not resizable.
At the top, you have the group of properties that we send to the systemto perform predefined actions (See technical doc).
In the initialization method of our controller, we make by default invisible the button that switches the tab containing the statusFrom our Minecraft server.
A little further down, we have methods that are called by our documentFXML when clicking buttons. It’s up to you to figure out what that they do. There is no catch.